C#で画像を描いてみた(WPFでWritableBitmap編)
WPFのC#で画像を描くとき、System.Drawing.BitmapからいちいちWPF用に変換するのもどうなのかなと思っていたら、WritableBitmapというのがあるのですね。ということで、System.Drawingを使わずにラスタ画像を描いてみました。 試した環境は下記です。
Visual Studio 2015 Express for Windows Desktop
目次
処理の流れ
「WritableBitmapをちびちびさわってみる。その1。」を参考にさせていただきました。 大まかには、下記の流れで処理します。
Byte配列の画像データを作る。
WritableBitmapクラスのインスタンスに、WritePixelsメソッドを使ってByte配列のデータを書き込む。
ImageコントロールのSourceプロパティにWirtableBitmapのインスタンスを渡す。
文字で見ると単純ですが、Byte配列を扱うあたりが、私のようなカジュアルユーザーには厳しいです。
WritableBitmapクラス
WritableBitmapクラスは書き込み可能なBitmapSourceのクラスです。 コンストラクターは2種類あって、引数に既存のBitmapSourceを渡すパターンと、パラメータを指定するパターンがあります。今回はイチから画像を描くので、後者を使います。
WritableBitmap bitmap = new WritableBitmap(width, height, dpix, dpiy, format, pallet);
引数 |
型 |
内容 |
|---|---|---|
width |
int |
画像の幅のピクセル数。 |
height |
int |
画像の高さのピクセル数。 |
dpix |
double |
画像の横方向解像度。 |
dpiy |
double |
画像の縦方向解像度。 |
format |
PixelFormat |
ピクセルのフォーマット。PixelFormatsのプロパティで指定できる。 |
pallet |
BitmapPallet |
カラーパレット。BitmapPalletsのプロパティ値で指定できる。 |
formatはPixelFormatsクラスのプロパティで指定できるのですが、MSDNではBgr32かPbgra32がお勧めされています。MSDNを見ててもBgra32とPbgra32の違いがよく分らなかったのですが、どうもPbgra32のPはpre-multiplyのことでアルファ値を各RGB値に掛けるタイミングをゴニョゴニョしてて効率良いらしいです。 palletはインデックスカラーを使うわけではないので、nullにしてみました。
WriteableBitmap.WritePixelsメソッド
WriteableBitmap.WritePixels()メソッドは、引数の指定の仕方をいろいろできます。「WritableBitmapをちびちびさわってみる。その1。」ではWritePixels(Int32Rect, Array, Int32, Int32)が紹介されていたのですが、ここではWritePixels(Int32Rect, Array, Int32, Int32, Int32)を使ってみます。
WritableBitmap.WritePixels(rect, array, stride, x, y);
戻り値はありません。
引数 |
型 |
内容 |
|---|---|---|
rect |
Int32Rect |
元画像データの四角形の大きさ。 |
array |
Array |
元画像データ。バイト配列。 |
stride |
int |
元画像データの1列あたりのバイト数。 |
x |
int |
書き込み先の上端位置。 |
y |
int |
書き込み先の左端位置。 |
バイト配列をWritableBitmapのインスタンスが持っているバッファに書き込むという感じでしょうか。WritableBitmapインスタンスのバッファをポインタを使って直接いじれるらしいですが、私にはハードルが高すぎです。とりあえず、バイト配列と戯れることにします。
試してみた
何を作る?
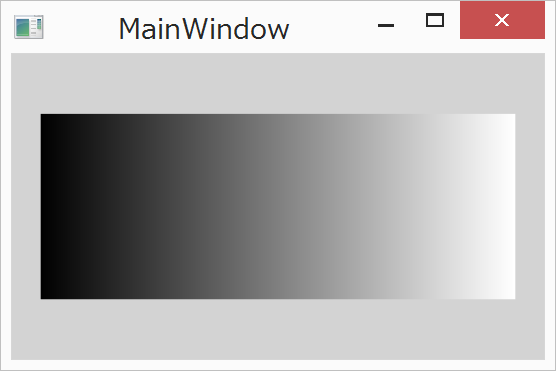
256x100の画像で、黒から白へのグラデーションを描いて、ウィンドウに表示してみます。
コード
参照の設定はありません。 XAMLとコードを下記の様にしました。
<Window x:Class="image_trial3.MainWindow"
        xmlns="http://schemas.microsoft.com/winfx/2006/xaml/presentation"
        xmlns:x="http://schemas.microsoft.com/winfx/2006/xaml"
        xmlns:d="http://schemas.microsoft.com/expression/blend/2008"
        xmlns:mc="http://schemas.openxmlformats.org/markup-compatibility/2006"
        xmlns:local="clr-namespace:image_trial3"
        mc:Ignorable="d"
        Title="MainWindow" Height="200" Width="300" Background="LightGray">
    <Grid>
        <Image Name="image" Stretch="None" />
    </Grid>
</Window>
ウィンドウ背景を灰色にしました。あとはImageを置いただけです。
using System.Windows;
using System.Windows.Media;
using System.Windows.Media.Imaging;

namespace image_trial3
{
    public partial class MainWindow : Window
    {
        public MainWindow()
        {
            InitializeComponent();

            // BitmapImageの準備
            int width = 256;
            int height = 100;
            int dpi = 96;
            WriteableBitmap bitmap = new WriteableBitmap(width, height, dpi, dpi, PixelFormats.Pbgra32, null);

            // 計算用のバイト列の準備
            int pixelsSize = (int)(width * height * 4);
            byte[] pixels = new byte[pixelsSize];

            // バイト列に色情報を入れる
            byte value = 0;
            for (int x = 0; x < width * height * 4; x = x + 4)
            {
                byte blue = value;
                byte green = value;
                byte red = value;
                byte alpha = 255;
                pixels[x] = blue;
                pixels[x + 1] = green;
                pixels[x + 2] = red;
                pixels[x + 3] = alpha;
                if (value < 255)
                {
                    value++;
                }
                else
                {
                    value = 0;
                }
            }

            // バイト列をBitmapImageに変換する
            int stride = width * 4; // 一行あたりのバイトサイズ
            bitmap.WritePixels(new Int32Rect(0, 0, width, height), pixels, stride, 0, 0);

            // ウィンドウに表示
            image.Source = bitmap;
        }
    }
}
System.Drawing.BitmapのARGBとはバイト順が違うみたいです。Pbgra32は青緑赤透の順に1バイトずつ並びます。
公開日
広告
C#で画像処理カテゴリの投稿
- C#でBitmapImageをByte配列に変換してみた
- C#でBitmapで描いた画像をImageコントロールに表示してみた
- C#でHSBで色指定してラスタ画像を描いてみた
- C#でOpenCVを使う
- C#でラスタ画像を描いてみた
- C#で写真の中の線を抽出してみた
- C#で描いた画像をファイルに保存してみた
- C#で画像の色を反転してみた
- C#で画像を描いてみた(WPFでBitmapSource.Create編)
- C#で画像を描いてみた(WPFでWritableBitmap編)
- C#で画像ファイルを表示してみた
- C#のOpenCvSharpでMatとBitmapSourceを変換する
- C#のWPFアプリでPNG形式の画像ファイルの読み込みと書き出しをする
