C#でBitmapImageをByte配列に変換してみた
WPFのC#ですが、画像ファイルの画像処理をしたくて、画像ファイルから作ったBitmapImageをByte配列に変換してみました。 試した環境は下記です。
Visual Studio 2015 Express for Windows Desktop
目次
処理の流れ
BitmapSourceで読み込もうとするとデコーダの設定が要るようですので、より柔軟なBitmapImageクラスを使ってファイルを読み込んで処理してみます。
画像ファイルを指定してBitmapImageのインスタンスを作る。
BitmapImageのインスタンスを元にして、FormatConvertedBitmapクラスのインスタンスをPixelFormats.Pbgra32で作る。
画像の大きさに合わせたByte配列を準備する。
CopyPixels()メソッドで、FormatConvertedBitmapのインスタンスからピクセルをByte配列にコピーする。
本当は画像ファイルのピクセルフォーマットに合わせたByte配列を準備するのがスマートなのでしょうが、そんな技は持ってないので有無を言わさずPbgra32にします。
FormatConvertedBitmapクラス
FormatConvertedBitmapクラスはBitmapSourceを継承したクラスで、PixelFormatの変換をするクラスです。空のインスタンスを作ってあれこれ設定することも出来ますが、コンストラクターに引数を設定して既存のBitmapSourceベースのインスタンスを作ることも出来ます。今回は、後者を使います。
FormatConvertedBitmap bitmap = new FormatConvertedBitmap(source, format, palette, alpha);
引数 |
型 |
内容 |
|---|---|---|
source |
BitmapSource |
変換元のBitmapSource。 |
format |
PixelFormat |
変換後のPixelFormat。PixelFormatsクラスのプロパティ値で設定する。 |
palette |
BitmapPalette |
変換後のBitmapPalette。BitmapPalletsクラスのプロパティ値で設定する。 |
alpha |
double |
アルファ(透明度)の変更後の閾値。0~100。デフォルトは0(元のアルファ値が0のピクセルを透明とする)。 |
Pbgra32はパレットが要らないので、paletteにはnullを設定します。
CopyPixels(Array, Int32, Int32)メソッド
CopyPixelsメソッドはBitmapSourceクラスからの継承なので、BitmapImageでもFormatConvertedBitmapでも使えます。いくつか引数によって使い方のパターンがありますが、CopyPixels(Array, Int32, Int32)メソッドはBitmapSourceからバイト配列にデータをコピーするものです。
BitmapSource.CopyPixels(array, stride, offset);
戻り値はありません。
引数 |
型 |
内容 |
|---|---|---|
array |
Array |
ピクセルデータを格納するByte配列。 |
stride |
int |
画像の1行あたりのバイト数。 |
offset |
int |
読み取り開始位置。 |
試してみた
コード
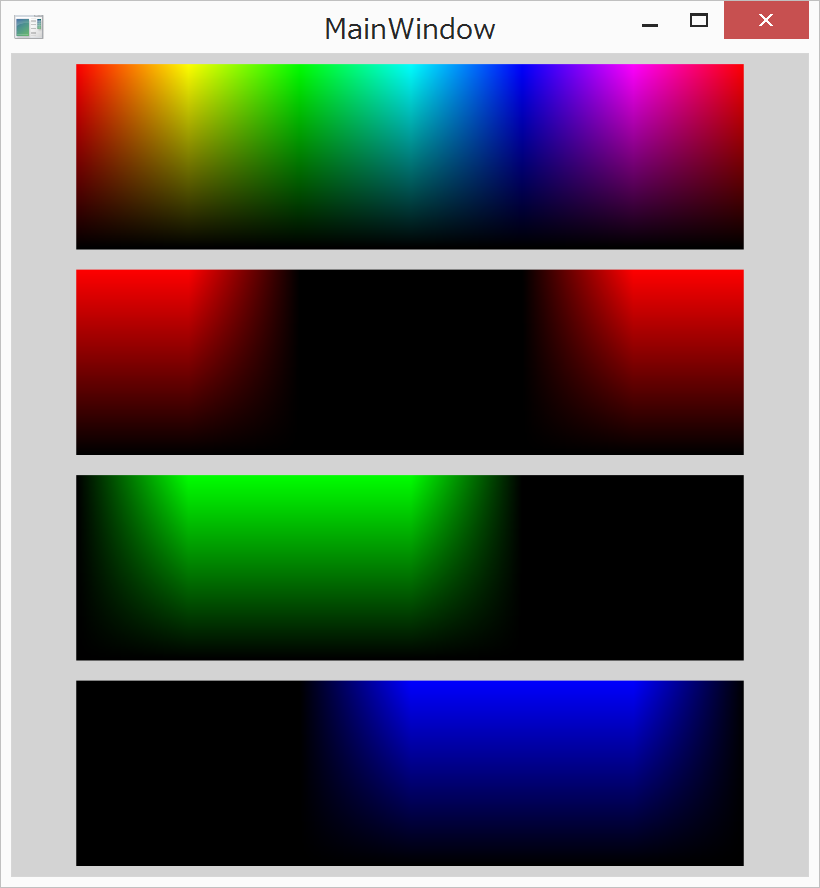
ウィンドウの方は、ウィンドウ枠内を縦に4つに分けて、それぞれのエリアにImageコントロールを配置します。
<Window x:Class="image_trial3.MainWindow"
        xmlns="http://schemas.microsoft.com/winfx/2006/xaml/presentation"
        xmlns:x="http://schemas.microsoft.com/winfx/2006/xaml"
        xmlns:d="http://schemas.microsoft.com/expression/blend/2008"
        xmlns:mc="http://schemas.openxmlformats.org/markup-compatibility/2006"
        xmlns:local="clr-namespace:image_trial3"
        mc:Ignorable="d"
        Title="MainWindow" Height="200" Width="300" Background="LightGray">
    <Grid>
        <Grid.RowDefinitions>
            <RowDefinition Height="1*" />
            <RowDefinition Height="1*" />
            <RowDefinition Height="1*" />
            <RowDefinition Height="1*" />
        </Grid.RowDefinitions>
        <Image Name="image" Stretch="None" Grid.Row="0" />
        <Image Name="imageRed" Stretch="None" Grid.Row="1" />
        <Image Name="imageGreen" Stretch="None" Grid.Row="2" />
        <Image Name="imageBlue" Stretch="None" Grid.Row="3" />
    </Grid>
</Window>
プログラムの方は下記です。
using System.Windows;
using System.Windows.Media;
using System.Windows.Media.Imaging;
using System;

namespace image_trial3
{
    public partial class MainWindow : Window
    {
        public MainWindow()
        {
            InitializeComponent();

            // ファイル読み込み
            string filename = @"test.png";
            BitmapImage bitmapimageOriginal = new BitmapImage(new Uri(filename, UriKind.RelativeOrAbsolute));

            // BitmapImageのPixelFormatをPbgra32に変換する
            FormatConvertedBitmap bitmap = new FormatConvertedBitmap(bitmapimageOriginal, PixelFormats.Pbgra32, null, 0);

            // 画像の大きさに従った配列を作る
            int width = bitmap.PixelWidth;
            int height = bitmap.PixelHeight;
            byte[] originalPixels = new byte[width * height * 4];
            byte[] red = new byte[width * height * 4];
            byte[] green = new byte[width * height * 4];
            byte[] blue = new byte[width * height * 4];

            // BitmapSourceから配列にコピー
            int stride = (width * bitmap.Format.BitsPerPixel + 7) / 8;
            bitmap.CopyPixels(originalPixels, stride, 0);

            // RGB要素を抜き出す
            for (int x = 0; x < originalPixels.Length; x = x + 4)
            {
                red[x] = 0;
                red[x+1] = 0;
                red[x+2] = originalPixels[x+2];
                red[x+3] = 255;
                green[x] = 0;
                green[x + 1] = originalPixels[x + 1];
                green[x + 2] = 0;
                green[x + 3] = 255;
                blue[x] = originalPixels[x];
                blue[x + 1] = 0;
                blue[x + 2] = 0;
                blue[x + 3] = 255;
            }

            // ウィンドウに表示する
            BitmapSource originalBitmap = BitmapSource.Create(width, height, 96, 96, PixelFormats.Pbgra32, null, originalPixels, stride);
            image.Source = originalBitmap;
            BitmapSource redBitmap = BitmapSource.Create(width, height, 96, 96, PixelFormats.Pbgra32, null, red, stride);
            imageRed.Source = redBitmap;
            BitmapSource greenBitmap = BitmapSource.Create(width, height, 96, 96, PixelFormats.Pbgra32, null, green, stride);
            imageGreen.Source = greenBitmap;
            BitmapSource blueBitmap = BitmapSource.Create(width, height, 96, 96, PixelFormats.Pbgra32, null, blue, stride);
            imageBlue.Source = blueBitmap;
        }
    }
}
特にひねっているところは無いと思います。
公開日
広告
C#で画像処理カテゴリの投稿
- C#でBitmapImageをByte配列に変換してみた
- C#でBitmapで描いた画像をImageコントロールに表示してみた
- C#でHSBで色指定してラスタ画像を描いてみた
- C#でOpenCVを使う
- C#でラスタ画像を描いてみた
- C#で写真の中の線を抽出してみた
- C#で描いた画像をファイルに保存してみた
- C#で画像の色を反転してみた
- C#で画像を描いてみた(WPFでBitmapSource.Create編)
- C#で画像を描いてみた(WPFでWritableBitmap編)
- C#で画像ファイルを表示してみた
- C#のOpenCvSharpでMatとBitmapSourceを変換する
- C#のWPFアプリでPNG形式の画像ファイルの読み込みと書き出しをする

